A Deck Chair

Modern Patio Furniture

Deck Chair

Purchase on Etsy

Summer is here and I’ve been thinking about relaxing on my deck, simply watching the world go by. Why not create a really nice patio chair for doing just that? Something inspired by wooden boats,  something reminiscent of Mid Century Modern or Danish Modern design. Something that can take a little weather if it’s left out for the weekend. The more I thought about it the more I started noticing that there are an awful lot of smaller sized balconies attached to some really nice condo units that could use a couple of really nice patio chairs too. If you’ve found my other blog you may know that I’ve been watching the new condos, especially those along the rivers in Milwaukee, pretty closely. (The picture links to that blog if you’re curious.) So, I designed this chair. It’s a little smaller than a lot of outdoor chairs out there so that a couple of them will easily fit on a condo balcony, yet it is very comfortable for even big guys like me.by Todd Fillingham I made the first two out of walnut, which turns out to be very durable wood for outdoor use (used in boat building worldwide), northern white cedar (another boat wood) and stainless steel. The back is easily removed (no tools needed) for shipping and storage . I finished the chair with my own mix of oils and spar varnish.  This is an easy chair, made for sitting back and relaxing, part of what I call my summer stress relief system.  Set it out and sit back. by Todd Fillingham

by Todd Fillingham

by Todd Fillingham Where can you get these? Two are now available on my Etsy site where it is very easy to order online.   I’ll deliver them  in the metro Milwaukee area with no shipping charge. Enjoy the summer!

By the way, I will be recommending on my Etsy site that these chairs be used in a protected outdoor setting however you can leave these chairs out in the weather all summer if you want. The finish may fade some. If it fades too much it can easily be restored, or better yet the chair can simply weather to a beautiful, stylish gray, it will still be just as comfortable. All metal parts are stainless steel so they won’t rust and the woods are highly resistant to rot.

Please feel free to leave a comment here to contact me. Or, if you would prefer you are welcome to use my alternate email address which is tfilling@execpc.com . I am also available on twitter as @toddfi .

buy now

Update: I’ve been asked for the dimensions of this chair. Here they are:

deck chair by Todd Fillingham all rights reserved


Guitar Stool/ Guitar Stand

PLEASE NOTE: Recently someone has been using pictures of my guitar stool and offering to sell the stool for $99. This is a fraudulent offer made by someone who has stolen my images. The only way to buy any of my work online is through my Etsy store.  -Todd

This  guitar stool/ guitar stand was created to have a great looking place to keep your guitar, have it readily available and have just the right spot to sit and play a few chords even if you have just a few minutes during a busy day. It offers a chance to step away from the hustle of the day, relax for a few minutes and renew yourself. This stool is now available at my Etsy store as a made to order item.

I am also showing it on my web site.

Yacht braid  creates a restraint to hold the guitar securely. This is easily removed from either end and is not required to hold the guitar, just an extra bit of safety for your valuable instrument.

Cork lined crotch  holds the guitar neck without damaging your guitar’s finish.

The seat is carved from walnut and the legs are ash.

Industrial felt is used to cushion all other contact areas. One note: this works best as a stand for hollow body guitars.

add to del.icio.us :: Add to Blinkslist :: add to furl :: Digg it :: add to ma.gnolia :: Stumble It! :: add to simpy :: seed the vine :: :: :: TailRank :: post to facebook

A small table from scrap pieces

small table by Todd Fillingham, all rights reserved

I had intended to post part II of the Three Rivers series before posting about anything else, but it has been some time since I’ve posted about furniture and I’ve just finished this new piece so I thought I’d sneak this post in now.

We needed a table of just the right height to hold a fan in our bedroom window at home.  Although I am in the midst of a pretty big project just now I thought I’d check out a few of my scrap piles to see if there was anything there to inspire me.

Dsc00893

Dsc00894

And, while I was at it, maybe I’d check out the paint locker and see what was lurking in there.

Dsc00895

Here’s what caught my eye:

A couple of pieces of MDF, some interesting walnut cut-offs and a nice green latex paint.

A couple of pieces of MDF, some interesting walnut cut-offs and a nice green latex paint.

I glued up the MDF pieces into a block 1-1/2″ thick-

Dsc00897

Cut the walnut cut-offs to a uniform length-

Dsc00898

Then drew a pleasing curve to shape the legs.

Dsc00899

I cut out the first leg, used it as a pattern to trace out the other two, cut them on the bandsaw and sanded the curved cut.

Dsc00900

Dsc00901

Dsc00903

Next I created a guide for my router to cut out the mortises into the top that would hold the legs.

Dsc00904

The legs were rounded over on the router table on the long straight face.

Dsc00905

I used a variety of implements to draw out a pattern for the top, created a template for 1/2 of the top, transferred that shape onto the top, flipping over the template to get the other half so that the curves would be symmetrical and shaped the top.

Dsc00907

Dsc00908

Dsc00909

I wanted to create an interesting joint detail where the legs met the top. I did some sketching and decided that the top should have its bottom edge rounded. This was done on the big shaper, a finger chewing machine if there ever was one.

Dsc00910

I managed to get the top rounded with out loosing any fingers and proceeded to cut the mortises on the under side of the top using the jig I had created earlier.

Dsc00912

I adjusted the fit of the legs into the mortises by carefully sanding down their final thickness.

Dsc00914

You can start to see what this table will look like at this stage. I still need to square off the round corners left by the router bit in the mortises. I did this by hand using a sharp chisel.

Dsc00918

Now I was able to see if the joint detail came out like I had hoped.

Dsc00921

OK, this was what I wanted. A look as if the legs were cradling the top. This is reminiscent to me of the original tripod that held a bowl or tray from eons ago.

And here’s the table before finishing:

Dsc00923

I painted the top, glued in the legs, rubbed on some of my special oil/ varnish mix and the table was complete.

Dsc00933sml2

add to del.icio.us :: Add to Blinkslist :: add to furl :: Digg it :: add to ma.gnolia :: Stumble It! :: add to simpy :: seed the vine :: :: :: TailRank :: post to facebook

Biedermeier

Armoire base by Todd Fillingham

I’ve been fortunate enough to have been commissioned to design and make a number of furniture pieces in the Biedermeier style. This is somewhat unusual in that my studio is located in the Midwest (of the North American continent). The one style that has been consistently popular in this region has been Arts & Crafts. It’s always pleasant to explore styles of other periods and regions.

The Biedermeier style evolved from the economic and political changes that swept Europe in the first half of the 19th century. Often thought of as a response to the French Empire style it has been characterized as resulting from the growth of the bourgeoisie in German speaking regions of Europe after the defeat of Napoleon at Waterloo in 1815. As with many efforts to shake off the old and make a change some of the furniture that emerged from this era was awkward and clunky.

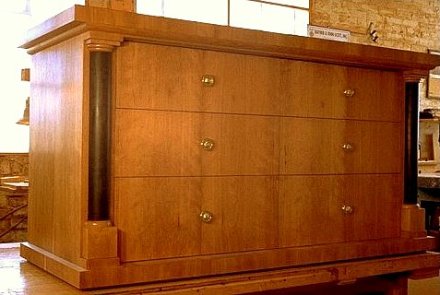
As a designer and craftsperson I sought to avoid the poorly proportioned and unbalanced look and try and discover elements of the Biedermeier style that were graceful. One of the first that struck me when studying Biedermeier furniture was the use of veneers in a way that tied a piece, particularly cabinetry, together into a unified whole. It is sometimes called a waterfall affect in which the grain is matched through all elements of a face and around onto the top. A detail from a piece I created can show this march of the grain.

I added red arrows to help illustrate this affect. You may be able to see it as well in this full image of the piece.

Even though the various parts and sections of the casework were not all aligned onto the same frontal plane, as if projected onto a flat screen, the use of the veneer grain contributed to what I see as a very modern look. It has a look as if the parts were punched out of one sheet of material and then folded around to create a three dimensional case. I also sometimes see it as if pigment was poured over the piece and allowed to drip down the front. Because it is the natural grain it is very naturalistic and at the same time very graphic. Perhaps this is why I often think of the Biedermeier style as a transitional style. It is by no means at a dead end. It is pointing to modernism.

By the way, it is not altogther clear where the term Biedermeier comes from. Joseph Aronson in his “Encylopedia of Furniture” from Crown Publishers 1965 says “[t]he name derives from a comic-paper character, Papa Biedermeier, symbol of homely substantial comfort and well-being –Gemutlichkeit.” And Hakan Groth says, “The term ‘Biedermeier’ is often wrongly assumed to be the name of a cabinetmaker or designer of the period. During the late 1840s in Austria and Germany, the preceding era (1815-1847) was subject to a barrage of satire, which finally led to the very furniture being mocked.” I have also seen reference to a fictional, comic poet named Biedermeier. It is clear however that this style did veer into regions that were easily mocked. Without jumping into an extended discussion about absolute values of design I will say that I wanted to work with the elements of Biedermeier style that could be brought together with a sense of proportion, balance and grace.

At the time I was exploring Biedermeier design I was doing almost all of my design work on paper in pencil and sometimes watercolor and colored pencil. Here is drawing of a chair I designed followed by a picture of the final piece.

In as much as the Biedermeier style was a reaction to the much more, perhaps, pompous Empire style it used a very similar vocabulary. It was far from revolutionary. It sought to adjust and perhaps contain some of the excesses the emerging bourgeoisie felt were beyond the pale. Among some of the elements that were retained and sometimes re-interpreted was the use of black to contrast with the grain of the fruit woods commonly used. Gone were the gold and the gilt however, except perhaps as discreet functional accents such as pulls. Another element retained was the column, that reference to Roman dominance and power. The Roman column was also and quite likely even more a symbol of stability. And it was in the use of the column that I was able to start to work out the proportions that I would use. For the columns used in western European design derive from the classical orders of Greek and Roman architecture.

There is a great reference book that I use quite a lot, “Cabinet Making and Millwork, Tools Materials Layout Construction” by Alf Dahl (who at the time was Head of the Building Trades Department of the Los Angeles Trade-Technical Junior College) and J. Douglas Wilson (who at one time was the curriculum supervisor for Trades and Industries at the Los Angeles City Schools), originally published in 1953 by the American Technical Society. In just over 300 pages this classic comprehensively covers and amazing amount of material. I may do a post just about this one book one day. For now I want to introduce two illustrations found in the book that show the classical orders and how proportions for various elements are derived from the diameter (D in the figures) of the column.

Click for larger size.

click for larger image

There are many ways to approach proportion and balance in design. Using the classical orders seemed appropriate historically when designing Biedermeier style furniture although it wasn’t always practical. All of this work was custom design work and as such I had to take into account the view of two clients in this case, the interior designer I was working with and the end user client. Sometimes I had to adjust proportions to meet the functional needs of my clients. I always try to do this adjustment within some coherent framework. In some cases I work with the proportions ascribed by the Golden Mean and have found that much of the architecture derived from the classical orders also relates to the proportions derived from the Golden Mean. Much has been written about the Golden Mean. All I will do here is draw your attention to a very interesting book on the subject by Gyorgy Doczi, “The Power of Limits, Proportional Harmonies in Nature, Art & Architecture” published in 1981 by Shambala press.

Here is a study I did for a proposed design for the desk pictured above.

The proposed column design is drawn horizontally across the top, many of the other proportions were derived from this element.

Another piece from this series was this large armoire, the base is shown at the top of this post.

The bedroom set was completed by two night stands and a bed.

This is a detail of the column base for the bed.

Another project that was related to the Biedermeier style of furniture I was fortunate to work on was a dining table I designed and made to go with a set of antique Biedermeier chairs a client had purchased. The interior designer I worked with on this project and the client had seen a table that they wanted to go with the chairs. The table had a solid top and they were looking for a glass top so they approached me. They gave me a small clipping of a small section of the carved legs that they particularly liked of the original table. I was able to create a table that was carved on both sides of the rails so that when one viewed the rails and legs through the glass top the whole piece looked finished. The table was then finished by Catherine Lottes using stains, glazes and gold leaf. Below are some images of the carved table base before and after the finish was applied.

Table carving by Todd Filingham

The challenges I’ve found when working in a wide variety of styles are part of the reason I love this work so much. You may have noticed that the style of work I’ve shown in his post is not very close to a lot of my other work. Nevertheless I find it fascinating that in being a craftsperson and working in other styles in which you have to actually create a real object or set of objects in the real world you have an opportunity to unwrap layers of history and thought. You are uncovering the same practical and aesthetic problems others, sometimes long ago, have worked on. Through your hands you can touch the ideas of others.

add to del.icio.us :: Add to Blinkslist :: add to furl :: Digg it :: add to ma.gnolia :: Stumble It! :: add to simpy :: seed the vine :: :: :: TailRank :: post to facebook

A Rocking Chair

A friend of mine and his wife are having a baby! They asked if I had a rocking chair design. I hadn’t, but it was something I had been thinking of and working on, off and on, for a long time. I decided to finally complete a design with the hope that my friend would like it and want the chair. Above is a rendering I’ve just completed of my design. Below I’ll write a little about the process of designing the chair.

I knew that one of the biggest hurdles facing me in this project was Sam Maloof. Sam created the definitive craftsman designed and made rocker many years ago. Many, many woodworkers have copied, emulated and been inspired by the Maloof chair and it’s no wonder. Not only is the Maloof chair in many ways beautiful he also published how he made the chair along with drawings with dimensions. The earliest article I’ve found is his “How I Make a Rocker” in the September/October 1983 issue of Fine Woodworking magazine.

Actually I told my friend about the Maloof rocker and he indicated that he had seen versions of it already but he wanted me to re-interpret that rocker in my own way. There were elements of that rocker that didn’t really look right to my eye, that I thought may have been concessions to practicality, to designing a chair that could be sold at a given price point perhaps. This is part and parcel of the design process and I cannot criticize this aspect of the process at all. It is necessary if the design will ever be built. But this did give me an entry point to the design.

I was surprised though that with so many others making versions of this chair no one else had addressed the issues that I saw. So, I decided to use the Maloof chair as my starting point and try and work out those elements that just didn’t sit right with me. In doing that I hoped that I would come up with a design distinctive enough that I could put my name on it.

Kem Weber designed a chair he called the Airline Chair. My sketchbooks have many drawings of variations of this chair and in going back through them to review my past attempts at this summit I decided to pull some of this work out and stare at it for a good long time. You can see an example of Weber’s chair here. And here is one of my sketches that shows the influence of that chair:

After quite a bit of sketching with pencil on paper I moved to my CAD program, Rhinocerous and started “sketching” on the computer. I developed a profile that I found interesting.

The circle and arrow were part of my study of the center of gravity for a person on the rocker.

I also used my “ergo man” to study the profile.

I would return to my ergo man throughout the process to check dimensions and the location of the arms and back spindles. I continued to refine the profile.

I then used the profile drawings to guide me as I built the design up into 3 dimensions. I also used the Flamingo rendering program to apply wood grain and texture to the design. Here is an early rendering I created to see if I was headed in the right direction.

It became apparent to me that I was getting close but still had a lot of work to do. It was right around here that I realized that I did not like the crest rail, that rail at the top that the spindles ended into. It was not only derivative of the Maloof design but it was too heavy for my eye.

Once I changed that rail I was free to change the profile of the back legs as they rose up to meet the crest rail. I was able to then add a curve in a different plane, to bow them slightly. This was getting exciting now.

Here’s an image showing the bow I am talking about.

The above image also shows the changes I made in the front legs. I added material to them and shaped them to reflect the bow of the back legs in the same plane. With the curve of the crest rail I was expressing a cradling of the sitter. I emphasized this cradling by adding curved brackets at the joint of the back legs and the crest rail, up at the top.

I resolved a couple of other issues, particularly the joint of the back legs to the arcs that curve under and support the seat and really felt as if this chair was becoming complete. Here’s another view of the finished design.

Since my friend and I are both surfers, as is my friend’s wife for that matter and their new baby will likely surf as well I did a rendering of the chair in maple with walnut stringers in the seat. A reference to surfboard stringers.

I list the chair on my website here although this is the only place I show the surfer version (so far).

add to del.icio.us :: Add to Blinkslist :: add to furl :: Digg it :: add to ma.gnolia :: Stumble It! :: add to simpy :: seed the vine :: :: :: TailRank :: post to facebook

Surf Board Table III -iv

glue-up.jpg

The table base is glued up. While the glue sets I’ll start sanding the boards I’ve glued up for the top. First I set up some cross pieces on a work bench.

set-up.jpg

By using shims I can get the three cross pieces aligned in a single plane. This helps as I need to now sand the top as flat as I can. Having the work piece rest on a flat plane helps a lot. And now I begin sanding the top. Table tops take a lot of sanding.

todd_sanding.jpg

I start with a belt sander.

To make sure that I am sanding the work piece flat I check it often with a pair of winding sticks.

p1010004.jpg

And then I go back to sanding. Eventually I get one face flat, then I turn it over and work on the other face. After an hour or so of using the belt sander I turn to a jig I developed some years ago to further flatten the work and to take out the machine marks left by the power belt sander.

p1010006.jpg

It’s good exercise!

When the top is flat and smoothed I lay the pattern back on it, trace the outline one more time and then cut it out with a jig saw.

p1010009.jpg

Sorry about the dust on the camera lens. Things are pretty dusty at this point.

The sawn edge is smoothed by using a sharp block plane.

block-plane.jpg

The edge is then rounded over with a router.

router.jpg

And the top is starting to look like a surfboard.

top1.jpg


Next in the series.

The Design Process: A Table, part 2

The dialog with my clients generated an interest in two of the sketched designs I had created, sketch #3 and sketch #4.

Table sketch #3 by Todd Fillingham Table sketch #4 by Todd Fillingham

Sketch #4 was derived from an earlier table I had made and shown in my portfolio. Jackie had wanted to be sure and have the table legs as far out towards the edge of the table top as possible to maximize leg room under the table. Both of these designs accomplish that as part of the design motif.

Since these designs were quick ideas drawn to look for a direction to move in to accomplish a final design I felt that they needed some refining. I discussed this with Jackie and Peter and got their impressions. From those discussions I created two designs, one of each table.

At this point I’ve started looking at the joinery as well as other technical considerations so that I don’t present a design that would be too expensive to accomplish. Here is design #3.

Dining table by Todd Fillingham

I had also modeled the site, the clients kitchen, in my 3D cad program and was able to place the table within that model to give my clients an idea of the scale of the table and how it would look in their space.


Dining table by Todd Fillingham

I did the same process for design #4.


Dining table by Todd Fillingham

I’ll show another view of the rendered model here. I provided Jackie and Peter with several views of each.


Dining table by Todd Fillingham


Dining table by Todd Fillingham


For both designs I also created line drawings with dimensions. Here is the line drawing for table #4. Click to get a larger view. Dining table by Todd Fillingham


Now it was up to Peter and Jackie to decide which of the two they liked the best or whether they would like to think about another approach. Their house had several elements that were of the Prairie/ Arts and Crafts genre. One of the elements of Arts and Crafts style is the use of exposed joinery and table #4 has more explicit exposed joinery. They eventually decided on #4.

After they made their decision I worked out a bid price for them and we signed a Commission Agreement detailing the design, materials, price, completion date and delivery details. I then created shop drawings, selected the lumber and built the table.

Here is a detail of the completed table showing the exposed joinery.

dsc00143.jpg The cherry will darken with age and exposure to light. The kitchen it went into had plenty of light exposure and that is why I rendered the models in dark cherry as the finished table would soon darken.

Jackie and Peter were quite happy with the table. As a matter of fact they wrote this testimonial for me:

Todd Fillingham is the best kept secret of a craftsperson in Milwaukee. He has a beautiful portfolio of lovely, creative and usable furniture. I have known Todd for 25 years but it was only when I heard his name sponsoring an NPR show did I think- “he is the one to design a perfect table for our newly remodeled kitchen.” And I was right. He looked at the site, he listened to my ideas, he did an array of drawings, he made a few alterations after discussions and he used both his sense of design and what I wanted with his skill and computer savvy to do a picture of a table that is exactly what he then produced in beautiful cherry wood. We thought the price was reasonable for this utilitarian piece of art.

Jackie Boynton


The Design Process: A Table, part 1

I’ve been meaning put up a post that describes the process I go through in designing a simple project such as dining table. This project was completed this fall.

The client contacted me about a dining table for a new kitchen they had recently added. The client, Jackie Boynton, and I discussed the general requirements and set an appointment or me to visit her house so that I could get a sense of the space and other furniture they had.

The table would need to regularly seat 3 and occasionally seat 4. Once I got to the site it appeared that an oval shape top would be appropriate. The new kitchen was contemporary enough, with large windows and clean woodwork for an oval to work, the space was somewhat small for a rectangle and we did not want to constrict the traffic flow of a busy kitchen, used for cooking, homework, family gathering and many other activities.

I eventually established a comfortable table size by taking measurements of the site, modeling the site in my 3D cad program and by using my “ergo man” model. This is a model I’ve created to allow me to assure enough room for table settings as well as many other ergonomic design concerns in many projects. Here’s a screen shot of this model:

ergo-man.jpg

Here’s an image I took while on site of the area the table would eventually occupy.p6050001.jpg

You can see the old table, obviously too small.

I manipulated this image in my photo editing application and added a rendering of an early sketch idea for a table to get a sense of the style direction I should be going towards.

adjusted.jpg

This process of manipulating the image in a photo editing program is awkward and doesn’t allow me to measure the clearance around the table and to get a good idea of how the table will look so I modeled the space in the 3D cad program and was able to drop in various rough ideas for table designs.

To get a dialog going betwenn Jackie and myself about the table design I created a series of 3D sketches and quickly rendered them and was able to email them to her and her husband, Peter. They were able to discuss them and get back to me. Here’s a link to my Flickr set showing several of these sketches:

byntn-sktch-thmb.jpg

I think that these designs have a lot of potential and look forward to interesting another client into having me finish one or more of them.

In part 2 I’ll show the two finalists that Jackie and Peter chose, the eventual final choice and the completed table.

web site progress

client-page.jpg

I’ve been working on the mock-up for my “client pages” landing page. The plan is to allow clients that want one to have a web page on my site on which I will post design images, details and related links to their project. They will then be able to post feedback to me any time they want and they will be able to share this page with friends and family to get their feedback. The whole point is to improve and sharpen the communication between my clients and myself particularly during the early stages of the design process.

I also want to develop a way to engage the secondary customer, the spouse, close friend or other person that my primary customer will likely seek approval from for their investment.

I am also creating a database of my work with associated images, bid spread sheets, product name, product ID number related thumbnail images, etc. I’ve looked at a lot of options for applications to help and have decided to stick with Excel to create a spreadsheet/ database and use Windows Explorer to add key words, i.e. product ID numbers, to the image files. This means that I have to save all the images that will be uploaded to my new web site as jpeg files. I use Paint Shop Pro to edit the images and optimize them to a resolution of 29 pixels/inch as well as to minimize the colors used. I cannot use PSP to add key words though because if I do it wipes out the key words Windows had as well as  the key words Picasa, another image sorting application I use, uses.

It became tiresome entering all of the file paths and file names into the spread sheet as Windows Explorer only allows you to copy the path, then to separately copy the file name. I decided to nose around a little on the web and I found this cool utility that adds an option to copy the path (with file name) onto the clipboard when you right click a file in Windows Explorer. It’s called ClipboardPath.  It saves a lot of time and aggravation.